Short, punchy, and often hilarious, GIFs are a popular and fun way to communicate on the Internet.
Got a raise at work? There’s a GIF for that.
Did some drama go down on the Real Housewives of Atlanta?
GIFs have got you covered!
But how do you make one?
The good news is that it’s ridiculously easy.
You won’t need to phone up your IT department.
Promise.
All you need to do is select HOW you want to make your GIFs (phone, laptop, a screen record), decide WHAT you want to make, and follow the steps below.
Here’s our ultimate guide on how to create GIFs!

What is a GIF?
So, er, what exactly is a GIF made of? Sorcery? Tons of code? That HTML stuff I hear so much about?
Nope.
A GIF is one of two things:
– A series of still images.
– A short clip from a video.
Why You Should Use GIFs
Feel like your content is stale? GIFs are a fun and incredibly easy way to get attention online.
Some of the reasons to include GIFs into your content mix:
– Easy way to convey a message.
– Give your brand a dash of personality.
– An eye-catching call-to-action.
– Tell a story in a couple of seconds.
How to Create a GIF on Your Computer
Giphy: For Beginner GIF Makers
Giphy is the ultimate web-based GIF tool. If the website was a movie star, it would be the One Ring To Rule Them All!
It’s an ideal GIF maker for beginners who don’t know to worry about tech specs like frame rate.
The best part?
You can use Giphy to make viral GIFs from YouTube videos, Vimeo, or an original video that’s under 15-minutes long. It also allows you to stitch together photos to create a GIF slideshow.
How Giphy Works
To make your first GIF, you can use Giphy’s web browser or mobile app for Android and iOS.
Make your choice and click on the “Create” button. The GIF Maker will load, and you can choose to upload a video or paste a link to existing online video content.
Next, use the editing tools to trim your clip down, and when you’re ready, hit the “Upload” button.
If you want to make a GIF slideshow, you can select photos from your computer or smartphone gallery. The editor will let you add drag-and-drop stickers, text, and photo content.
How to Create a GIF with Canva
Canva – everyone’s favourite graphic design tool has dropped a GIF feature!
It’s one of the best options for non-techies on a budget who want to make beautiful animated on-brand videos.
Tip: The GIF option is only available on Canva Pro and it costs $12.95 USD per month.
How Canva Works
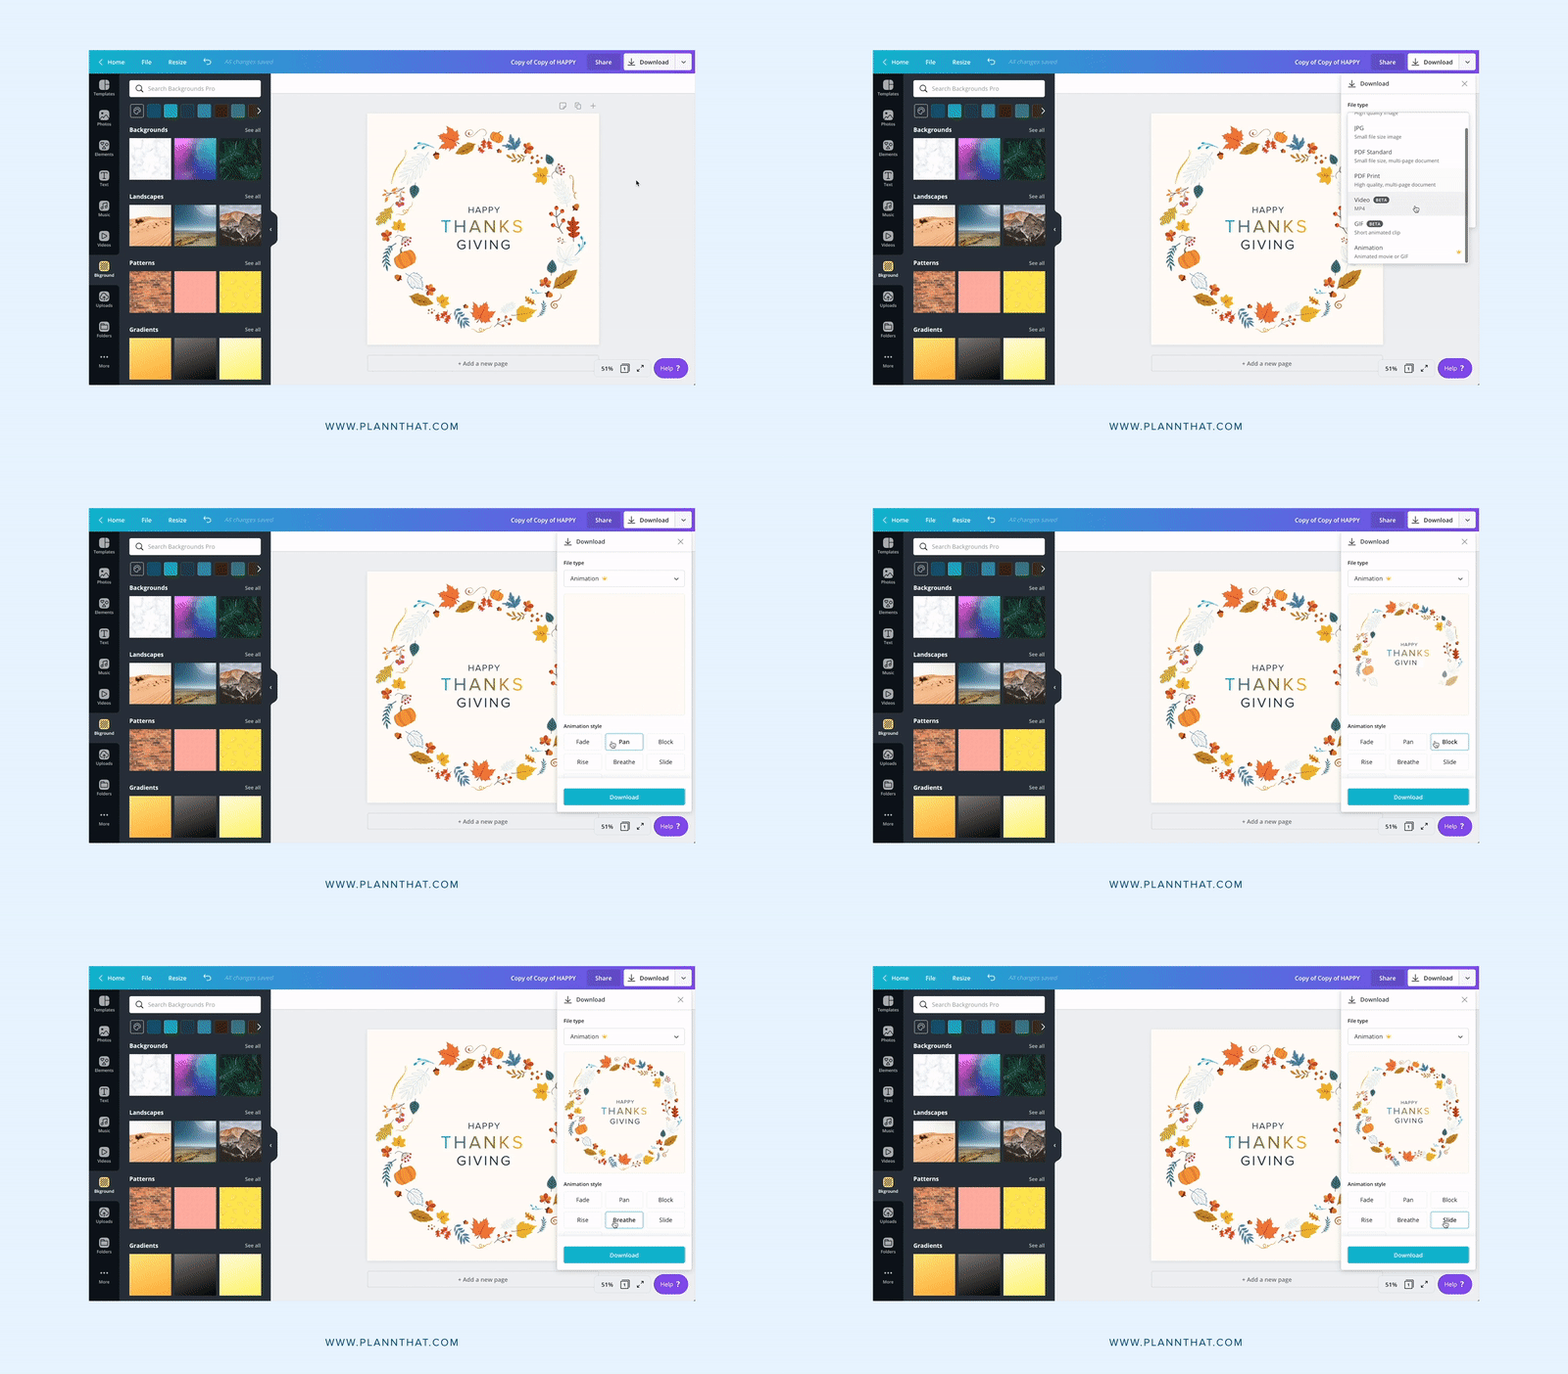
To create a GIF with Canva, make a design as normal.
Once you’re done, click on the download button in the top right-hand corner and select the option “Animated GIF/Movie.”
A new window will load, and you can choose from six Canva GIF animations to apply to your design.
When you’ve decided on an option, download your creation, either as a GIF or movie.
(You’ll need the movie option if you’re planning to upload your GIF on a website that doesn’t support GIFs.)

Photoshop: How to Make High-Quality GIFs
Photoshop is not the best GIF maker option if you:
– Don’t want to pay $9.99 per month
– Don’t want to figure out how to import video frames to layers
BUT
If you’re a serious GIFer who wants to make high-quality masterpieces, Photoshop is your mecca.
The application has plenty of powerful tools that will give you all the freedom you need to edit your videos and create meme-worthy content.
How to Use Photoshop to Make a GIF
Want to make a GIF of The Witcher featuring Henry Cavil saying his famous line “Hmmm”?
Or any other iconic TV or movie moment?
You’ll need to download an application called VLC media player and use it to pull the clip from the full video.
Here’s how:
1. Open the video in VLC.
2. Select View -> Advanced controls.
3. Pause the video 10 seconds before the clip you want starts.
4. Click on the record button and press play.
5. When you’re done, click on the record button.
And voila! You’re done with the first step.
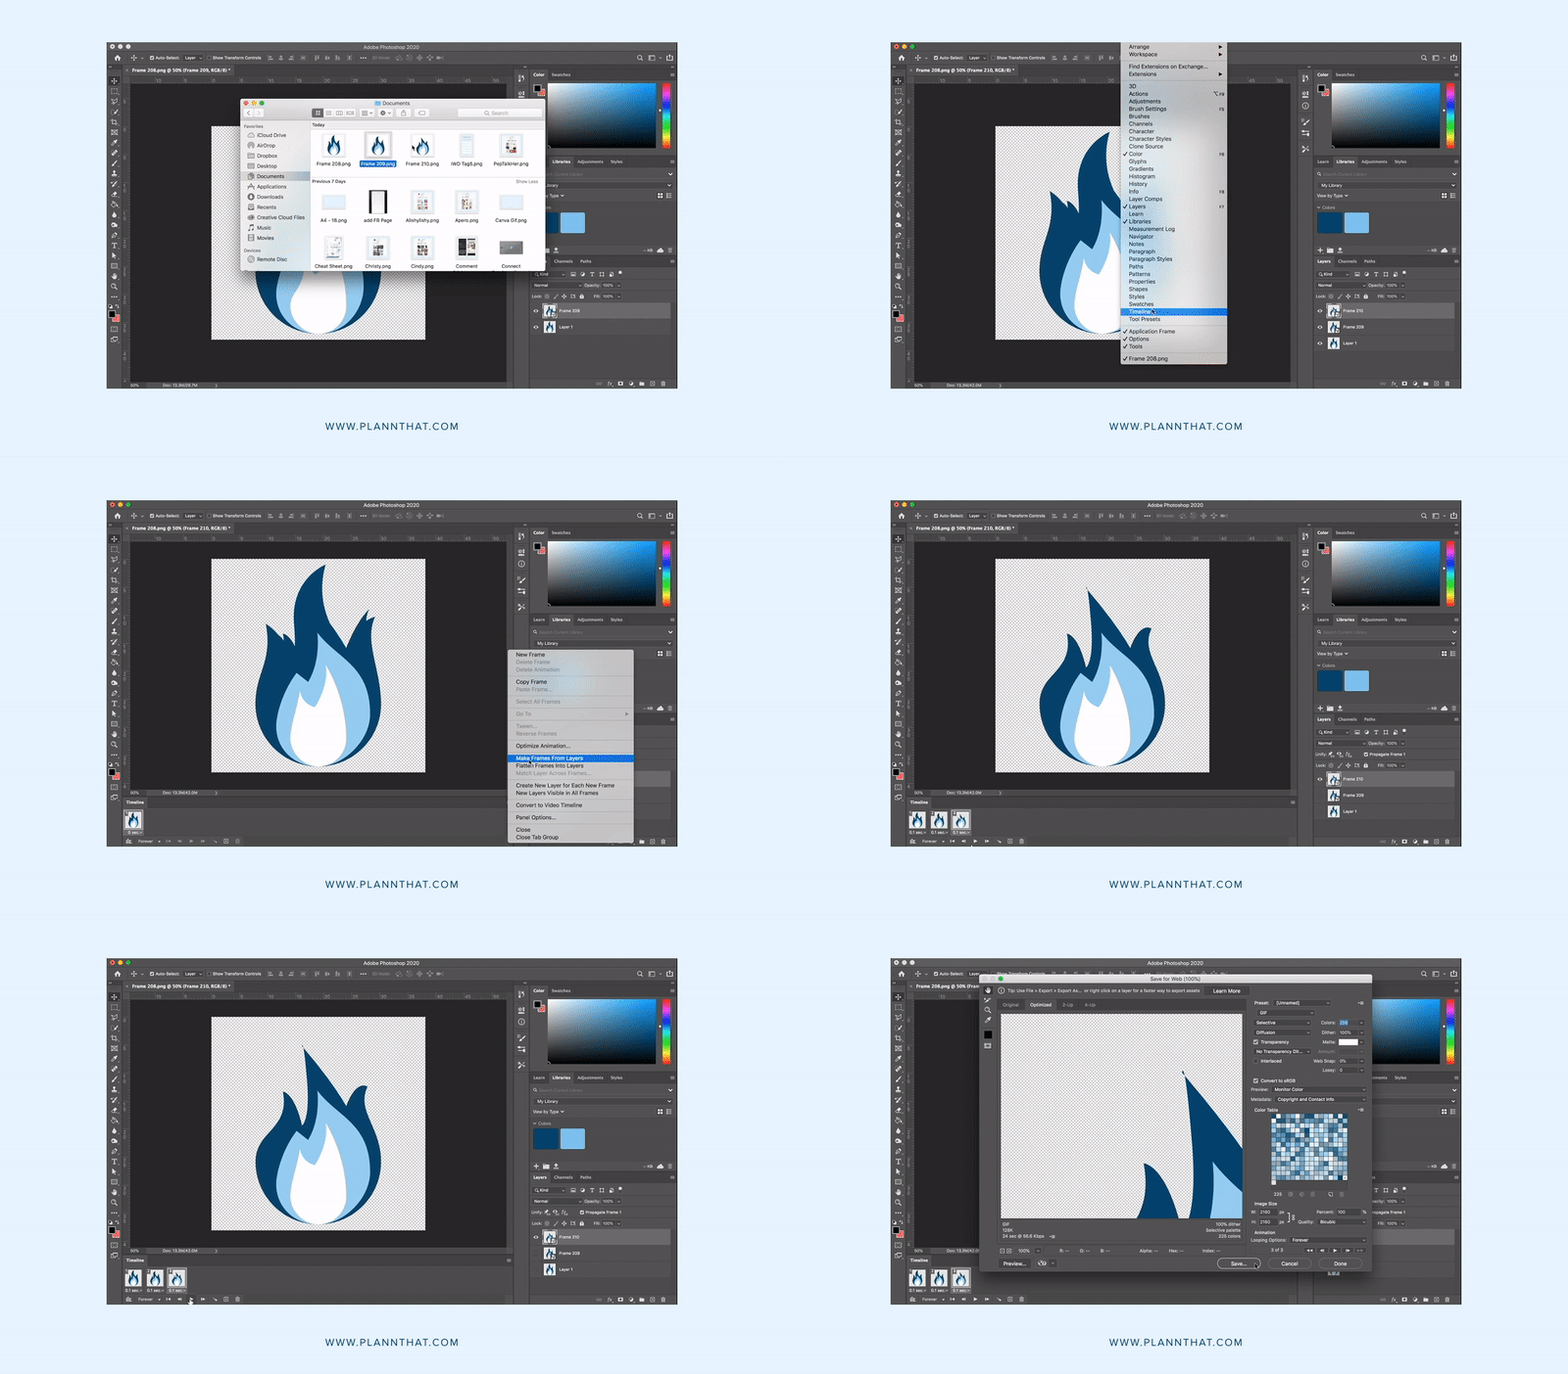
Now it’s time to open up Photoshop to start creating your GIF.
Here’s how:
1. Open Photoshop.
2. Select File -> Import -> Video Frames to Layers.
3. Trim the clip down.
4. If you want to spice up your GIF, you can use the text and filter tools to edit your frames.
5. When you’re done, select File -> Save for Web.
6. Select “Adaptive” under the first drop-down box underneath “GIF”.
7. Under “Looping Options” select “Forever”.
8. Click Save.

Congrats! You’ve successfully made your first GIF in photoshop!
All that’s left to do is upload it onto the Internet and share your creation with the world.
ScreenToGif: Make a GIF from a Screen recording
Want to create a GIF of your business call, Livestream, or an Instagram Story?
Then, you’ll love the ScreenToGif app!
It’s perfect for Windows users who want to capture a viral moment and share it with their friends.
If you’re using a Mac, you can use Giphy Capture, GIF Brewery 3, or Smart GIF Maker App.
How to Use ScreenToGif
1. Open the video you want to record on your computer.
2. Open ScreenToGif -> Recorder
3. Drag and resize the ScreenToGif app until it’s on top of your video and is visible inside the box.
4. Pause the video a few seconds before the clip you want starts playing.
5. When you’re ready, play and video and click on the red record button.
6. Click on the blue square button to stop recording.
7. The program will now load a new interface where you can edit your GIF and save it to your computer.
How to Make a GIF with an Android Device
GIF Editor
One of the best GIF-maker apps for Android users is the GIF Editor.
It has everything you could possibly want to create beautiful videos.
The app lets you:
– Adjust the number of frames per second.
– Apply decorations like animated stickers and effects.
– Turn photos or videos into GIFs.
– Create and save your creations without watermarks
The only downside?
The free version does have a cap on image resolution. You’ll only be able to make GIFs that are 448×578 px.
If you want something larger, say 720px, you’ll need to buy the Pro version for $2.00 USD.
How to Use GIF Editor
To create your first GIF, you can choose from the following buttons on the app’s home screen:
– Images -> GIF.
– Video -> GIF.
– Camera -> GIF.
– Screen record -> GIF.
Once you’ve made your selection and upload the content, the GIF editor will load.
It gives you a ton of options to play around with such as:
– Crop images and videos by 1:1; 3:4; 3:2 or 16:9.
– Colour grading.
– Decoration with emojis and text.
– Direction.
– Fine-tune the speed.
– Insert an existing GIF.
– Ability to draw on your GIF with a pen tool.
– Trim your video file.
When you’re done making all of your adjustments, click on the “tick” in the top right-hand corner.
A pop-up screen will load, where you can select the quality of your GIF, and there’s an option to compress the GIF’s file size.
Want to go back and edit a GIF you’ve made?
Select the “Edit GIF” option on the home screen, and you can easily make changes to your file.
How to Make a GIF with an iPhone
ImgPlay
Bored to tears with Live Photos and Boomerangs on Instagram?
Looking for something with a little bit more pizazz?
Download the free ImgPlay app. It’s available on iOS and Android, and it gives you dozens of options for GIF creating.
Choose from the built-in temples, adjust your number of frames per second, and level up your game!
The only thing that miiiight make you want to stick to your Live Photos is the ugly beautiful watermark the app slaps on top of all your creations.
If you want it gone, you have to pay $4.99 USD for the Pro version.
How to Use ImgPlay
Once you’ve downloaded the app, it automatically groups the content on your device by type.
All your videos, photos, Live Photos, GIFs are in separate folders, streamlining your GIF creation process.
If you want to shoot new images with your phone’s camera, tap on the camera icon, and snap away.
When you’re ready to edit, the app splits your screen into three regions:
– Top bar: All the frames in your video.
– Middle: Current content you’re editing.
– Bottom: Design options available like templates, stickers, etc.
Go Forth and Create Some GIFs!
Which one of these five GIF-making methods are you going to try? Have any questions? Let us know in the comments below!


